Security principles
This chapter discusses the different security options supported by Krake, and gives explanation on how to set up Krake securely.
Overview
When sending a request to the API, Krake uses two mechanisms to limit resource access:
- first the authentication of the user;
- then, using this information, an authorization mechanism describes which resources can be accessed by this user.
Important
There are no user in Krake as actual stored resource. Krake does not manage users, they should be handled by external services (for instance Keystone authentication). Users are identified internally using simple strings. The authentication method ensures that the right string is obtained from a request, and the authorization ensures that the user represented by this string has the right accesses to the resources.
Important
If a Krake component (a controller, or Rok) communicates with the API, the same process is performed. In this case, the user is actually the component itself.
Authentication
To authenticate the user, five different mechanisms can be used: static, Keystone, Keycloak, TLS or anonymous. When a request is received by the API, all the mechanisms enabled in this list will attempt to authenticate the user that sent the request. If the first failed, the second will try, and so on, until all failed, and an HTTP error “Unauthorized (401)” will be sent back to the API. The first that succeeds returns the user that has been authenticated. It is then used during the authorization process.
The order of priority between the authentication mechanisms is as follow (if the mechanisms are enabled):
- static:
- This mechanism should never be used in production. When enabled, this mechanism will authenticate any request as coming from a user with a given username. This username needs to be specified in the API configuration.
- Keystone:
- authenticate incoming requests on the API using an OpenStack Keystone server. A
token must first be requested to the Keystone server. This token should then be
sent along with any request to the API as the value of the
Authorizationheader in the HTTP request. See Keystone authentication for more information. - Keycloak:
- authenticate incoming requests on the API using a Keycloak server. A token must
first be requested to the Keycloak server. This token should then be sent along with
any request to the API as the value of the
Authorizationheader in the HTTP request. See Keycloak authentication for more information. - TLS:
- authenticate incoming requests on the API using the common name attribute of certificates. This name is then used as username. It means TLS needs to be enabled on the API, and thus, on all Krake components. See Certificate authentication for more information.
- Anonymous:
- This mechanism should never be used in production. Set using
allow_anonymousto true in the configuration. If the user has not been authenticated by any previous mechanism, and if anonymous users are allowed, the user will be authenticated assystem:anonymous.
The authentication mechanisms can be enabled or disabled in the API configuration file, along their specific parameters (see Authentication and authorization).
Authorization
The second phase of security is the authorization of an authenticated user. The user is verified against the chosen authorization policy, called authorization mode in the following. If a user has the right to access and perform the chosen action on the resource currently requested, the request is processed. Otherwise the API returns an HTTP 403 error.
Krake uses three different authorization modes to connect to the API, always-allow,
always-deny and RBAC.
always-allow- all requests are always accepted, for any user;
always-deny- all requests are always rejected, for any user;
RBAC(for Role-Based Access Control)- Krake will use roles to decide the resources that a user can access, and the action that this user can perform on these resources.
Warning
The first two modes are only present for testing purposes and should never be used
in production. Only RBAC should be used in production.
The authorization mode can be chosen in the configuration file (see Authentication and authorization).
Keystone authentication
The Keystone authentication uses the OpenStack Keystone service to obtain the identity of a user. The workflow to send a request to the API is as follow if Keystone authentication is enabled:
- (the user must be registered in Keystone;)
- the user sends a request to the Keystone server to obtain a token;
- an HTTP request is sent to the API, with this token used in the header.
Step 1: Kesytone token request
To request a token to the Keystone server, you can use the following example by replacing the values with the corresponding ones for your setup:
$ curl -sD - -o /dev/null -H "Content-Type: application/json" \
    http://<keystone_server>/v3/auth/tokens \
    -d '{
      "auth": {
        "identity": {
          "methods": [
            "password"
          ],
          "password": {
            "user": {
              "domain": {
                "name": "<keystone_user_domain_name>"
              },
              "name": "<keystone_username>",
              "password": "<keystone_password>"
            }
          }
        },
        "scope": {
          "project": {
            "domain": {
              "name": "<keystone_project_name>"
            },
            "name": "<keystone_project_domain_name>"
          }
        }
      }
    }'
The following example is for the support/keystone/keystone script:
$ curl -sD - -o /dev/null -H "Content-Type: application/json" \
    http://localhost:5000/v3/auth/tokens \
    -d '{
      "auth": {
        "identity": {
          "methods": [
            "password"
          ],
          "password": {
            "user": {
              "domain": {
                "name": "Default"
              },
              "name": "system:admin",
              "password": "admin"
            }
          }
        },
        "scope": {
          "project": {
            "domain": {
              "name": "Default"
            },
            "name": "system:admin"
          }
        }
      }
    }'
You will get an output close to the following, where you can find the expected token:
HTTP/1.0 201 CREATED
Date: Tue, 42 Dec 2077 10:02:11 GMT
Server: WSGIServer/1.0 CPython/3.8
Content-Type: application/json
Content-Length: 1234
X-Subject-Token: XXXXXXXXXXXXXXXXXXXXXX   <--- this is the token
Vary: X-Auth-Token
x-openstack-request-id: xxx-xxxxxxxx-xxxx-xxxx-xxxx-xxxxxxxxxxxx
From this output, you can obtain your token. A suggestion is to keep it in your shell as environment variable, for instance:
$ TOKEN=XXXXXXXXXXXXXXXXXXXXXX
Step 2: Keystone token usage
Using your token, you can then communicate with the Krake API:
$ curl -k -H "Accept: application/json" -H "Authorization: $TOKEN" \
        <scheme>://<krake_api>/<query>
For instance, to get the current authenticated user on Krake installed locally, with TLS support:
$ curl --cacert ./tmp/pki/ca.pem -H "Accept: application/json" -H
        "Authorization: $TOKEN" https://localhost:8443/me
Keycloak authentication
The Keycloak authentication uses a Keycloak service to obtain the identity of a user. The workflow to send a request to the API is as follow if Keycloak authentication is enabled:
- (the user must be registered in Keycloak;)
- the user sends a request to the Keycloak server to obtain a token;
- an HTTP request is sent to the API, with this token used in the header.
Step 1: Keycloak token request
Query
To request a token to the server, multiple ways are supported by Keycloak. If the server has been set up for direct access grants, you can use the following example by replacing the values with the corresponding ones for your setup:
$ curl -s http://localhost:9080/auth/realms/krake/protocol/openid-connect/token \
    -d 'grant_type=password' \
    -d 'username=<username>' \
    -d 'password=<password>' \
    -d 'client_id=<client_name>' \
    -d 'client_secret=<client_secret>'
For the support/keycloak script, you can use the following command to get a token:
$ support/keycloak token
Internally, something similar to the following is used, with all values set by the script:
$ curl -s http://localhost:9080/auth/realms/krake/protocol/openid-connect/token \
    -d 'grant_type=password' \
    -d 'username=krake' \
    -d 'password=krake' \
    -d 'client_id=krake_client' \
    -d 'client_secret=AVeryCoolAndSecureSecret'
Response
Using the cURL queries, you will get a JSON with the following structure:
{
    "access_token":"XXXXXXXXXXXXXXXX",
    "expires_in":60,
    "refresh_expires_in":1800,
    "refresh_token":"<refresh_token>",
    "token_type":"bearer",
    "not-before-policy":0,
    "session_state":"9c22a6df-0997-4d3d-a540-239f85346008",
    "scope":"profile email"
}
From this output, you can obtain your token from the access_token field. A
suggestion is to keep it in your shell as environment variable, for instance:
$ TOKEN=XXXXXXXXXXXXXXXXXXXXXX
With the support/keycloak direct command, you get the token directly, thus you could
simply use:
$ TOKEN=$(support/keycloak token)
Step 2: Keycloak token usage
Using your token, you can then communicate with the Krake API:
$ curl -k -H "Accept: application/json" -H "Authorization: $TOKEN" \
        <scheme>://<krake_api>/<query>
For instance, to get the current authenticated user on Krake installed locally, with TLS support:
$ curl --cacert ./tmp/pki/ca.pem -H "Accept: application/json" -H
        "Authorization: $TOKEN" https://localhost:8443/me
Certificate authentication
With the TLS support enabled on the API configuration, the requests to the API can only be performed using HTTPS. This allows Krake to obtain information about the sender through the certificates. Especially, Krake can use the common name to identify the user that sent the request.
This authentication mechanism should always be used in a production environment. It
also allows the authentication of the Krake components. The scheduler, the garbage
collector or any other controller should have a certificate with a specific common
name. This name can then be used along with the RBAC mode and a specific
RoleBinding to allow the controller to access the resources it needs.
Important
With TLS support, all Krake components will use certificates with their corresponding key. All components (API, controllers and rok) must use the same CA, and the certificates they use for communication must also be signed using this CA.
Note
If an external endpoint is specified in the Kubernetes controller configuration for the complete hook, then this host must also be specified in the certificate of the API.
RBAC Authorization
The Role-Based Access Control (or RBAC) is a model of resource access. Each user is given one or several roles, and each role has access to one or several resources, and/or actions.
When RBAC is enabled, roles need to be defined and bound to users using respectively
Role and RoleBinding core API objects. They have their own endpoints for
creation, update, deletion… (/core/roles and /core/rolebindings
respectively).
Role bindings
The RoleBinding objects defines a connection between one or several roles to one or
several users.
Roles
A Role defines different rules: each rule describes which resource can be accessed
by a user with this role, and which action can be performed. The Role can then be
applied to several users, which is the purpose of RoleBinding objects.
Example
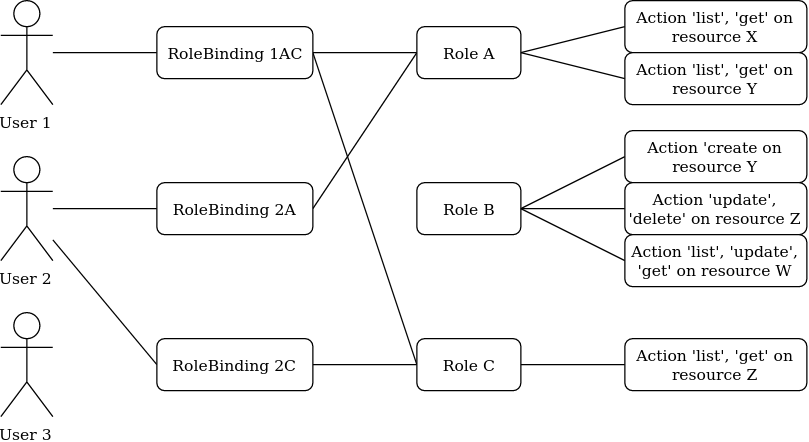
In the previous example, the user 1 and 2 have both been given the roles A and C. It means they can both get and list the resources X, Y and Z.
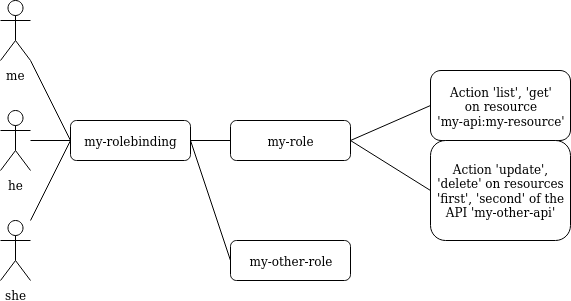
Let’s now say we want to have the following minimal example:
api: core
kind: Role
metadata:
  name: my-role
rules:
- api: 'my-api'
  resources:
  - 'my-resource'
  namespaces:
  - 'my-namespace'
  verbs:
  - list
  - get
- api: 'my-other-api'
  resources:
  - 'first'
  - 'second'
  namespaces:
  - 'my-namespace'
  verbs:
  - update
  - delete
In the above example definition of a Role, a user with this role can:
- list or read the
my-resourceresources defined in themy-apiAPI, that belong to themy-namespacenamespace (first rule);- update or delete the
firstandsecondresources defined in themy-other-APIAPI, also in themy-namespacenamespace (second rule).
api: core
kind: RoleBinding
metadata:
  name: my-rolebinding
roles:
- my-role
- my-other-role
users:
- me
- he
- she
In the above example, the RoleBinding object binds the my-role and the
my-other-role to the users me, he and she.
Security Guidelines
Warning
DISCLAIMER: The steps described in this chapter do not ensure a fully secure Krake infrastructure. They are the minimal security steps that are recommended. An actual fully secure setup need general security measures on all its components and on the setup itself, not only for the Krake infrastructure
This section is a guide that describes all the steps to create a minimal secure Krake infrastructure.
What you need:
Krake installed;
the Krake repository (optional);
a certificate authority (CA) and at least five certificates and their respective keys (signed with this CA). To follow this guide easily, the common names of the certificates shall be:
system:gcsystem:schedulersystem:kubernetessystem:magnumsystem:infrastructuresystem:adminsystem:complete-signingsystem:shutdown-signing- an additional certificate is necessary for the API.
These names are the ones present in the bootstrapping file called
base_roles.yaml. They can naturally be modified to follow your needs.
The support/pki script can also generate them for testing purpose, example:
$ support/pki system:admin
The certificate with system:complete-signing will be used for signing new
certificates, thus would need to be set for signing purposes:
$ support/pki system:complete-signing --intermediate-ca
The certificate with system:shutdown-signing will be used for signing new
certificates, thus would need to be set for signing purposes:
$ support/pki system:shutdown-signing --intermediate-ca
If Krake is not deployed locally, you also need to set its external endpoint as TLS subject alternative names, for instance:
$ support/pki system:api-server --host 1.2.3.4 --host example.com
Configuration of the API
The first step is to configure the API to use the right authentication and authorization modes.
Configuration of the authentication:
First, disable the static and anonymous authentications in the API configuration:
authentication:
  allow_anonymous: false

  #...
  static:
    enabled: false
    name: system:admin
Then, enable the TLS support on the API:
tls:
  enabled: true
  cert: <path_to_your_certificate>
  key: <path_to_your_key>

  client_ca: <path_to_your_client_ca>
If you want to use Keystone or Keycloak authentication additionally, you should set the configuration as well:
authentication:
  # ...

  strategy:
    # Keystone authentication
    keystone:
      enabled: true
      endpoint: <your_keystone_endpoint>

    # Keycloak authentication
    keycloak:
      enabled: true
      endpoint: <your_keystone_endpoint>
      realm: <your_keycloak_realm>
Krake contains an example Keystone server under support/keystone/Dockerfile.
This is a docker file, which creates an image with a secure Keystone instance, that
can be accessed over HTTPS.
Configuration of the authorization:
To set the RBAC authorization mode, change the following line
in the API configuration:
authorization: RBAC
Configuration of the Controllers
You need to enable the TLS support on all controllers:
tls:
  enabled: true
  client_ca: <path_to_your_client_ca>
  client_cert: <path_to_your_client_cert>
  client_key: <path_to_your_client_key>
The API endpoint must be modified to use HTTPS:
api_endpoint: https://<endpoint>
This certificate must indicate a common name only used by the current controller. Let’s
refer to it as system:<controller> as an example. Using TLS authentication,
system:<controller> will be the username of the Controller every time this
controller will connect to the API, see Authentication
When using bootstrapping, the “username” of the controllers must be adapted to
correspond to the ones in the RoleBinding objects added in the database. See
Database bootstrapping.
If the bootstrapping file present in the repository is used (base_roles.yaml), the
common names of the controller certificates must be:
system:gcfor the garbage collector;system:schedulerfor the scheduler;system:kubernetesfor the Kubernetes controller;system:complete-signingfor the signing certificate of the “complete” hook, see Complete.system:shutdown-signingfor the signing certificate of the “shutdown” hook, see Shutdown.system:magnumfor the Magnum controller.
Configuration of rok
api_url: https://<endpoint>   # must use HTTPS
user: <rok_user>

tls:
  enabled: true
  client_ca: <path_to_your_client_ca>
  client_cert: <path_to_your_client_cert>
  client_key: <path_to_your_client_key>
The common name used by the certificate must match the one from <rok_user>. This
name will be used as username.
If the bootstrapping file present in the repository is used (base_roles.yaml),
the certificate used by the administrator must have system:admin as common name,
and <rok_user> must then match it.
Database bootstrapping
For the RBAC authorization mode to work, Role and RoleBinding objects need to
be put in the database.
They can be either added manually using the command line, or more simply added by using
bootstrapping (see Bootstrapping). The roles for the Krake
components and the administrator are defined already in
bootstrapping/base_roles.yaml. Thus they can all be added with:
$ krake_bootstrap_db bootstrapping/base_roles.yaml
When using the base_roles.yaml, the usernames in the RoleBinding for the
controllers must match the ones used by the certificates.
For instance for the garbage collector, if the RoleBinding is defined like this:
api: core
kind: RoleBinding
metadata:
  name: rolebinding:system:gc
roles:
- role:system:gc
users:
- system:gc
it means that the certificate common name for the garbage collector must be
system:gc. It is probably easier to adjust the base_roles.yaml to match your
needs.
Additional roles and role bindings can also be added to the database using the same
bootstrapping method, by modifying the base_roles.yaml, or by writing another file
and bootstrapping it into the database.
Administrator
The role role:system added in the base_roles.yaml corresponds to an
administrator role, and the role binding rolebinding:system allows a user called
system:admin full access to all Krake resources from all APIs. These two can
naturally be modified if the administrator should have another name.
Important
Note that if no administrator user is created, Role and RoleBinding objects
cannot be created through the API, but must be added to the database directly.
CORS
The Cross-origin resource sharing (CORS) mechanism was enabled on Krake but the fields
are set to be quite non-restrictive. By default, the Access-Control-Allow-Origin is
set to *. With this setup, sending request through a browser could be dangerous. A
user could first connect to a valid website with some allowed authentication token and
send requests to Krake. Then the user goes on a malicious website, which may be able to
reuse the token, as the default value accepts any origin, so any URL. To prevent this
situation, the value for the Access-Control-Allow-Origin field can be set for the
Krake API, see the Authentication and authorization part of
the configuration.